Create/copy Message-Box
There are two ways to create a new message box. If you want to create a message box whose properties are not similar to any message box that has been entered before, then press the "New Message Box" button.
If you want to create a message box that is similar to an existing message box and that you only want to change in a few points, then please select the "Original Message Box" in the table. This opens the detailed view of the message box. There you can create a copy of the message box by pressing the "Copy" button. The mandatory fields are marked with a red star behind the identifier. They are highlighted in red as long as they are not sufficiently filled out. In the message box dialog there are 4 tabs that can be used to edit a message box.
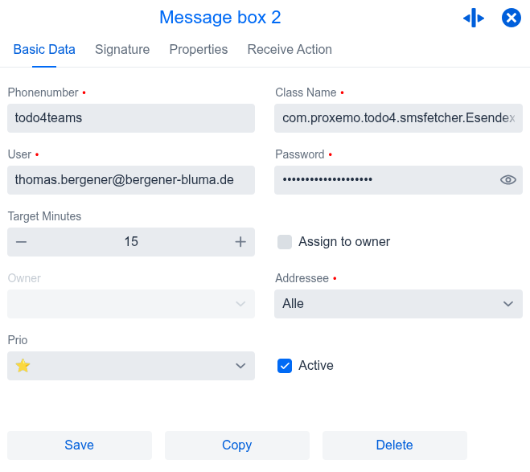
Basic data
The first tab, "Basic Data," contains the following properties of the message box:
- Phonenumber: The telephone number under which this message box is registered
- Class Name: Java class name of the service implementation, usually com.proxemo.todo4.smsfetcher.EsendexSmsServiceImpl
- User name: The user to access the service
- Password: The password of the message service user. For an Esendex account use the API key here!
- Target minutes: Enter the deadline in minutes within which the incoming message should be processed.
- Assign owner and owner: If you want incoming messages to be automatically assigned an owner, activate this option and select a user. This user will then see the received emails in their ticket outbox and can monitor whether they are processed on time. This user can also correct the addressing and processing deadline of the tickets. If you leave this option deactivated, the message tickets can be forwarded by the processors in the ticket inbox. The forwarding user then becomes the owner of the ticket and is responsible for it.
- Recipient: Set here which team the tickets in this message box are forwarded to by default.
- Priority: Specify the priority of the generated tickets.
- Active: The message box will only be read if this field is activated.
Esendex
If you use an Esendex account, please note these notices.

Signature
The second tab "Signature" stores the text that is used when tickets from this message box are answered in todo4teams. The signature is automatically added as a footer.

Properties
Advanced settings for configuring the message box are entered in the "Properties" tab.

Receive action
This script is executed when an email is received from todo4teams. In this script you can enter any Store business logic to optimally control the processing of tickets.

Once you have made all the settings for this message box, you can press the "Save" button to make the message box with these settings available in todo4teams. You can exit this dialog at any time by pressing the "Close" button.